1. Java 基础知识 1.1. 引用 & 对象
对象 :类的实例化,实质为运行时堆内为类内各属性值顺序分配的一组内存空间。引用 :传递消息的入口(通过引用访问与之关联的对象的各属性值或调用对象的方法,类似方法调用),引用可不指向对象单独存在(但仅声明无意义)
备注:Java 中除基本类型外,其他类型都是类 class ,都能实例化为对象,eg. String
1.1.1. Java 引用与 C/C++ 指针的区别
1.1.2. equals () 的引用和对象区别(忽视将会造成重大问题)
equals () 默认行为是比较引用(而非对象的内容),如自定义类调用
大多数 Java 类库实现了 equals () 可比较对象的内容 1 2 3 4 5 6 7 Test t1 = new Test(10 ); Test t2 = new Test(10 ); System.out.println(t1.equals(t2)); String s1 = new String("Hello" ); String s2 = new String("Hello" ); System.out.println(s1.equals(s2));
1.2. String 用法小记 1.2.1. String 当作对象处理需要 new Java 将 String 视为一个对象,而非 C/C++ 中的数据类型
1 2 String str1 = new String(); String str2;
1.2.2. 初始化字符串的其他方法 1 2 3 4 5 String str = "Hello World" ; String str = new String("Hello World" ); String str = new String(char Array[]); String str = new String(str1 + str2); String str = str1;
1.2.3. 访问字符串指定下标的字符
1.2.4. 判断两个字符串是否相等 1 2 str1.equals(str2); str1.equalsIgnoreCase(str2);
1.2.5. 比较两个字符串
1.2.6. 分割字符串 1 2 3 4 5 6 7 8 9 10 11 12 13 14 15 16 17 18 19 20 21 String str = "Hello world xiao ming" ; String[] strArray = str.split(" " ); for (int i = 0 ; i < strArray.length; i++) { System.out.println(strArray[i]); } String str = "Hello world xiao ming" ; String[] strArray = str.split(" " , 3 ); for (int i = 0 ; i < strArray.length; i++) { System.out.println(strArray[i]); }
1.2.7. 查找子串 1 2 str.indexOf(String s); str.lastIndexOf(String s);
1.2.8. 返回字符串去除前后空格的子串的副本
1.2.9. 替换子串 将字符串内的部分子串替换为另外子串
1 String newStr = str.replace("ABC" , "abc" );
1.2.10. 判断字符串是否以目标子串开始或结束 1 2 boolean a = str.startsWith("He" );boolean b = str.endsWith("llo" );
1.2.11. 转换大小写字符 1 2 str = str.toLowerCase(); str = str.toUpperCase();
1.3. 数组用法小记 1.3.1. 声明初始化二维数组 1 2 3 4 5 int array1[][] = {{0 }, {1 ,2 ,3 }, {4 ,5 ,6 ,7 }};int array2[3 ][];array2[0 ] = new int [1 ]; array2[1 ] = new int [3 ]; array2[2 ] = new int [4 ];
1.3.2. 填充数组
1.3.3. 排序数组
1.3.4. 复制数组 1.3.4.1. copyOf(int a[], int length);
若 length 小于 a.length,创建 length 大小的数组,然后复制 a 的前 length 长度的元素
若 length 大于 a.length,创建 length 大小的数组,复制整个数组 a,其后部分默认值 0 填充 1 int newArray[] = Arrays.copyOf(array, 5 );
1.3.4.2. copyOfRange(int a[], int fromIndex, int toIndex); 创建 toIndex-fromIndex 大小的数组(可大于原始数组,其后用 0 填充),复制数组 a 从下标 fromIndex 到下标 toIndex-1 的元素备注 :
若 toIndex-1 > a.length-1,只复制到 a [a.length-1] 且其后填 0
fromIndex 必须在取值范围 [0, a.length-1] 内,否则报错
1.3.4.3. 特殊用法,给已固定数组扩容 1 array = Arrays.copyOf(array, array.length*2 );
1.4. 产生随机数小记 Java 产生随机数的方式有两种:调用 Math 类的 random () 方法、调用 Random 类
1.4.1. 调用 Math 类的 random () 方法 1 2 double num = Math.random();double num2 = a + Math.random() * (b - a);
1.4.2. 调用 Random 类 1 2 3 4 5 6 7 8 Random r = new Random(); Random r2 = new Random(SeedValue); Random r = new Random(); int b = r.nextInt(100 );boolean c = r.nextBoolean();float d = r.nextFloat();double e = r.nextDouble();double f = r.nextGaussian();
注意 :两次函数调用的时间间隔过小,可能返回相同的随机数。
2. Java 核心技术 2.1. Java 类的继承小记 用代码更亲切地展示继承相关细节
1 2 3 4 5 6 7 8 9 10 11 12 13 14 15 16 17 18 19 20 21 22 23 24 25 26 27 28 29 30 31 32 33 34 35 36 37 38 39 40 41 42 43 44 45 46 47 48 49 50 51 52 53 54 55 56 57 58 59 60 61 62 63 64 65 66 class GrandParents GrandParents(){ System.out.println("调用爷爷类的构造函数" ); } @Override protected void finalize () throws Throwable System.out.println("销毁爷爷类实例" ); super .finalize(); } } class Parents extends GrandParents Parents(String name){ System.out.println("调用父类:" +name+"的构造函数" ); } protected void doSomething () @Override protected void finalize () throws Throwable System.out.println("销毁父类实例" ); super .finalize(); } } class Childron extends Parents Childron(){ super ("Parents" ); System.out.println("调用子类的构造函数" ); } public void doSomething () public void doSomething (int a) public int doSomething (int ... a) int sum=0 ; for (int i = 0 ; i < a.length; i++) { sum += a[i]; } return sum; } @Override protected void finalize () throws Throwable System.out.println("销毁子类实例" ); super .finalize(); } } public class Main public static void main (String[] args) Childron c = new Childron(); System.out.println(c.doSomething(1 ,2 ,3 ,4 ,5 )); try { c.finalize(); } catch (Throwable throwable) { throwable.printStackTrace(); } } }
2.2. Object 类 Java 每个类都直接或间接继承于 java.lang.Object 类。在 Object 类中主要包括: clone (), finalize (), equals (), toString () 等可重写的方法,及 getClass (), notify (), notifyAll (), wait () 等不可重写方法(Object 中被定义为 final 类型)
2.2.1. getClass () 方法 返回对象执行时的 Class 实例,一般于获取类的名称 getName () 方法连用
1 String name = c.getClass().getName();
2.3. Java 接口小记 接口是抽象类的延伸,可以将它看作是纯粹的抽象类,接口中的所有方法都没有方法体。接口的可以在子类中更灵活地选择方法功能,一个子类可以选择多个接口,然后每个接口类的方法都在该子类中有具体实现,不需要的方法直接不用接口就行,相比于在父类定义虚函数造成代码冗余和不能多继承,接口的出现更方便在子类中按需添加自定义方法。
2.3.1. 对比接口与抽象父类 2.3.1.1. 1. 先定义抽象父类实现子类不同方法的需求 1 2 3 4 5 6 7 8 9 10 11 12 13 14 15 16 17 18 19 20 21 22 23 abstract class Quadrangle abstract void draw () abstract void ba () } class Rhomboid extends Quadrangle public void draw () public void ba () } class Square extends Quadrangle public void draw () public void ba () } class Rectangle extends Quadrangle void draw () void ba () }
2.3.1.2. 抽象父类缺点:
造成极大代码冗余
引发逻辑问题,不需要某些方法的子类必须重写抽象父类的所有虚函数,与逻辑不符
2.3.1.3. 2. 定义接口,子类灵活选择接口即可 1 2 3 4 5 6 7 8 9 10 11 12 13 14 15 16 17 18 19 20 21 22 23 24 25 26 27 28 29 30 interface drwaTest public void draw () } interface bala public void ba () } class Quadrangle } class Rhomboid extends Quadrangle implements drwaTest public void draw () System.out.println("绘制平行四边形" ); } } class Square extends Quadrangle implements drwaTest , bala public void draw () System.out.println("绘制正方形" ); } public void ba () System.out.println("balabala" ); } } class Rectangle extends Quadrangle }
2.3.1.4. 接口优点:
逻辑清晰,随意加减接口,灵活实现
精简代码,只需将子类所需的接口中的方法重写即可
子类不能继承多个抽象父类(不能多重继承),但子类却可添加多个接口
2.4. 异常 常见异常:空指针,数组溢出,被除数为 0,……,自定义异常等。
2.4.1. 自定义异常 1 2 3 4 5 6 7 8 9 10 11 class MyException extends Exception private String message; public MyException (String errorMessage) super (errorMessage); this .message = errorMessage; } public String getMessage () return message; } }
2.4.2. 捕获异常 1 2 3 4 5 6 7 8 9 10 11 12 13 14 15 16 17 18 19 20 21 22 23 24 25 26 27 28 29 30 31 32 33 34 35 36 37 38 39 40 41 42 43 44 public class Main static int average (int num1, int num2) throws MyException if (num1 < 0 || num2 < 0 ) { throw new MyException("数字不能为负" ); } if (num1 > 100 || num2 > 100 ) { throw new MyException("数字不能超过100" ); } return (num1 + num2) / 2 ; } public static void main (String[] args) int x=102 , y=5 , z=0 ; boolean isExceptionFlag = true ; try { z = average(x, y); z += x / y; isExceptionFlag = false ; } catch (MyException e) { System.out.println(e.getMessage()); } catch (ArithmeticException e) { System.out.println("除数不能为0" ); } finally { if (isExceptionFlag) System.out.println("发生异常" ); else System.out.println("未发生异常" ); } } }
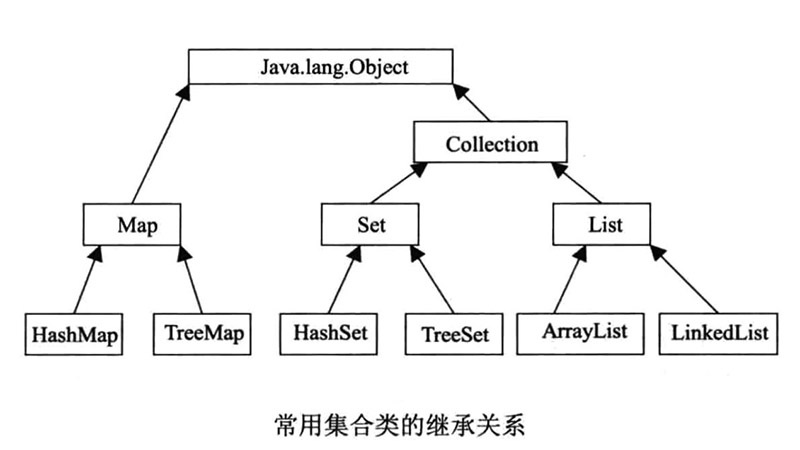
2.5. Swing 程序设计(跳过) 2.6. 集合类 集合类,又称容器。常见的集合类有:List 集合,Set 集合,Map 集合,其中 List 与 Set 继承了 Collection 接口。常见集合类的继承关系
与数组区别 :
数组的长度固定,而集合的长度可变;
数组存放基本类型的数据,集合存放对象的引用。
2.6.1. List 集合 List 的接口常用的实现类有:ArrayList 与 LinkedList 。ArrayList :实现了可变长数组,允许保存所有元素,包括 null,可根据索引快速访问数组内元素,但插入或删除元素时间较长。LinkedList :采用链表结构存储元素(数组元素上限仅受可用内存限制),类似链表,插入删除元素较快,但随机访问都会从头结点开始顺序向下遍历,故随机访问较慢。
1 2 3 4 5 6 7 List list1 = new ArrayList<>(); List<String> list2 = new LinkedList<>(); list1.add('a' ); list1.add('b' ); list1.remove(1 ); System.out.println(list1);
2.6.2. Set 接口 Set 接口的常用实现类有:HashSet 与 TreeSet HashSet :由哈希表支持(实际上是一个 HashMap 实例),不保证 Set 的迭代顺序(不稳定),允许使用 null 元素TreeSet :TreeSet 实现的 Set 集合在遍历集合时按照自然顺序递增排序
1 2 3 4 5 6 7 8 9 10 11 12 13 14 15 16 17 TreeSet<String> tree = new TreeSet<>(); tree.add("ZhangSan" ); tree.add("LiSi" ); tree.add("WangWu" ); Iterator<String> it = tree.iterator(); while (it.hasNext()) { String tmp = (String)it.next(); System.out.println(tmp); }
2.6.3. List 集合 vs Set 集合
List 集合允许元素重复,而 Set 集合不能包含重复对象
List 集合元素顺序为插入顺序(类似数组),而 Set 集合不保证顺序
List 访问指定索引的元素 get(int index) 或 set,而 Set 集合不能访问指定索引元素
2.6.4. Map 集合 Map 接口的常用实现类有 HashMap (无序,允许 null 值) 和 TreeMap (升序,不允许 null 值)。
1 2 3 4 5 6 7 8 9 10 11 12 13 14 15 16 17 18 19 20 21 22 23 24 25 Map<Integer, String> map = new HashMap<Integer, String>(); map.put(1 , "ZhangSan" ); map.put(2 , "LiSi" ); map.put(3 , "WangWu" ); Set<Integer> s = map.keySet(); Iterator<Integer> it = s.iterator(); while (it.hasNext()){ System.out.println(it.next()); } Collection<String> c = map.values(); Iterator<String> it2 = c.iterator(); while (it2.hasNext()){ System.out.println(it2.next()); }
2.7. 文件 File 2.7.1. 文件的创建与删除 1 2 3 4 5 6 7 8 9 10 11 12 13 File file = new File("/Users/haoleeson/Test/test.txt" ); File file1 = new File("/Users/haoleeson/Test/" , "test2.txt" ); if (file.exists()) { file.delete(); System.out.println(file.getName() + "文件已存在, 故删除" ); } else { try { file.createNewFile(); System.out.println(file.getName() + "文件不存在,故创建" ); } catch (IOException e) { e.printStackTrace(); } }
2.7.2. File 文件的常用方法 1 2 3 4 5 6 7 8 9 10 11 12 13 14 15 16 17 18 19 20 String FileName = file.getName(); boolean isReadable = file.canRead();boolean isWriteable = file.canWrite();boolean isFileExisted = file.exists();long FileLength = file.length();String FileAbsolutePath = file.getAbsolutePath(); String FileParentPath = file.getParent(); boolean isAFile = file.isFile();boolean isADirectory = file.isDirectory();boolean isHiddened = file.isHidden();long lastChangeTime = file.lastModified();System.out.println("lastChangeTime = " + lastChangeTime); SimpleDateFormat dateFormat = new SimpleDateFormat("yyyy-MM-dd HH:mm:ss" ); System.out.println(file.getName() + "文件的最近修改时间为:" + dateFormat.format(new Date(lastChangeTime)));
2.7.3. 文件输入输出流 操作磁盘文件,可满足简单的文件读写需求。但由于读写操作以字节或字节数组为单位,由于汉字占两个字节,若读取 readBuff [] 容量设置为单字节,或正好错开一字节会导致汉字乱码。
1 2 3 4 5 6 7 8 9 10 11 12 13 14 15 16 17 18 19 20 21 22 23 24 25 26 27 28 29 30 31 32 33 34 35 File file = new File("/Users/haoleeson/Test/test.txt" ); try { FileOutputStream out = new FileOutputStream(file); byte writeBuff[] = "写入如下字符串以测试简单文件输出流功能。" .getBytes(); out.write(writeBuff); out.close(); } catch (FileNotFoundException e) { e.printStackTrace(); } catch (IOException e) { e.printStackTrace(); } try { FileInputStream in = new FileInputStream(file); byte readBuff[] = new byte [1024 ]; int len = in.read(readBuff); System.out.println("读取到的内容如下:\n" + new String(readBuff, 0 , len) + "<END>" ); in.close(); } catch (FileNotFoundException e) { e.printStackTrace(); } catch (IOException e) { e.printStackTrace(); }
2.7.3.2. FileReader 与 FileWriter 类 能够避免 FileInputStream 与 FileOutputStream 类可能出现的汉字读写乱码现象。FileReader 流顺序地读取文件,只要不关闭流,每次调用 read () 方法就顺序地读取源中的内容,直到源的末尾或流被关闭。
1 2 3 4 5 6 7 8 9 10 11 12 13 14 15 16 17 18 19 20 21 22 23 24 25 26 27 28 29 30 31 32 33 File file = new File("/Users/haoleeson/Test/test.txt" ); try { FileWriter out = new FileWriter(file); String writerStr = "尝试写入如下字符串以测试FileWriter文件输入流功能。\n" ; out.write(writerStr); out.close(); } catch (IOException e) { e.printStackTrace(); } try { FileReader in = new FileReader(file); char readBuff[] = new char [1024 ]; int len = in.read(readBuff); in.close(); System.out.println("读取到的内容如下:\n" + new String(readBuff, 0 , len) + "<END>" ); in.close(); } catch (FileNotFoundException e) { e.printStackTrace(); } catch (IOException e) { e.printStackTrace(); }
2.7.3.3. 带缓存的输入 / 输出流 BufferedInputStream 与 BufferedOutputStream 类。BufferedInputStream 类可以对所有的 InputStream 类进行带缓存区的包装以达到性能的优化。
1 2 BufferedInputStream(InputStream in); BufferedInputStream(InputStream in, int size);
BufferedOutputStream 类有一个 flush () 方法可以将缓存区内的数据强制输出到磁盘(无论缓存区满否)
1 2 BufferedOutputStream(OutputStream out); BufferedOutputStream(OutputStream out, int size);
BufferedReader 与 BufferedWriter 类
1 2 3 4 5 6 7 8 9 10 11 12 13 14 15 16 17 18 19 20 21 22 23 24 25 26 27 28 29 30 31 32 33 34 35 36 37 38 39 40 41 42 43 File file = new File("/Users/haoleeson/Test/test.txt" ); try { FileWriter fileWriter = new FileWriter(file); BufferedWriter bufferedWriter = new BufferedWriter(fileWriter); String writerStr = "尝试写入如下字符串以测试带缓存区的输出流功能。" ; bufferedWriter.write(writerStr); bufferedWriter.newLine(); bufferedWriter.close(); fileWriter.close(); } catch (IOException e) { e.printStackTrace(); } try { FileReader fileReader = new FileReader(file); BufferedReader bufferedReader = new BufferedReader(fileReader); String readStr = null ; int row = 0 ; while ((readStr = bufferedReader.readLine()) != null ) { row++; System.out.println("读取到第" + row + "行的内容为:" + readStr); } System.out.println("<END>" ); bufferedReader.close(); fileReader.close(); } catch (FileNotFoundException e) { e.printStackTrace(); } catch (IOException e) { e.printStackTrace(); }
BufferedReader 类的常用方法如下:
1 2 3 int ch = bufferedReader.read();System.out.println("ch = " + (char )ch); String readStr = bufferedReader.readLine();
BufferedWriter 类的常用方法如下:
1 2 3 bufferedWriter.write(writerStr, 0 , writerStr.length()); bufferedWriter.flush(); bufferedWriter.newLine();
2.7.3.4. 数据输入输出流 DataInputStream 与 DataOutputStream 类
1 2 3 4 5 6 7 8 9 10 11 12 13 14 15 16 17 18 19 20 21 22 23 24 25 26 27 28 29 30 31 32 33 34 File file = new File("/Users/haoleeson/Test/test.txt" ); try { FileOutputStream fileOutputStream = new FileOutputStream(file); DataOutputStream dataOutputStream = new DataOutputStream(fileOutputStream); dataOutputStream.writeUTF("尝试以UTF格式写入内容。" ); dataOutputStream.close(); fileOutputStream.close(); } catch (FileNotFoundException e) { e.printStackTrace(); } catch (IOException e) { e.printStackTrace(); } try { FileInputStream fileInputStream = new FileInputStream(file); DataInputStream dataInputStream = new DataInputStream(fileInputStream); String readStr = dataInputStream.readUTF(); System.out.println("以UTF格式读取的内容为: " + readStr + "<END>" ); dataInputStream.close(); fileInputStream.close(); } catch (FileNotFoundException e) { e.printStackTrace(); } catch (IOException e) { e.printStackTrace(); }
2.7.3.5. ZIP 压缩输入 / 输出流(压缩 / 解压文件) ZIP 压缩管理文件(Zip archive)是一种十分典型的文件压缩形式。常用 ZipOutputStream 与 ZipInputStream 类来实现文件的压缩 / 解压缩 。
2.7.3.5.1. 压缩文件(ZipOutputStream 类) 若要将某个文件添加到 ZIP 压缩管理文件内,必须先写入待添加文件的目录进入点(待添加文件在 ZIP 文件内的位置),并且把待添加文件内容的位置移到此进入点说指的位置,然后再写入文件内容。
1 2 3 4 5 6 7 8 9 10 11 12 13 14 15 16 17 18 19 20 21 22 23 24 25 26 27 28 29 30 31 32 33 34 35 36 37 38 39 40 41 42 43 44 45 46 47 48 49 50 51 52 53 54 55 56 57 58 59 60 61 62 63 64 65 66 67 68 69 70 71 72 73 74 75 import java.io.*;import java.util.zip.ZipEntry;import java.util.zip.ZipOutputStream;public class ZipTest public void zipFile (String zipFileName, File inputFile) throws Exception File unzipFile = new File(zipFileName); String Base = inputFile.getName(); ZipOutputStream out = new ZipOutputStream(new FileOutputStream(zipFileName)); zip(out, inputFile, Base); out.close(); } private void zip (ZipOutputStream zipout, File file, String base) throws Exception if (file.isDirectory()) { File[] fl = file.listFiles(); for (int i = 0 ; i < fl.length; i++) { String tmpBase = base + "/" + fl[i].getName(); zip(zipout, fl[i], tmpBase); } } else { zipout.putNextEntry(new ZipEntry(base)); FileInputStream in = new FileInputStream(file); int ch; System.out.println("压缩 " + base + " 位置的 " + file.getName() + " 文件 ..." ); while ((ch = in.read()) != -1 ) { zipout.write(ch); } in.close(); } } public static void main (String[] args) ZipTest zipTest = new ZipTest(); String zipFileName = "/Users/haoleeson/Downloads/Test.zip" ; String inputFile = "/Users/haoleeson/Test/" ; System.out.println("尝试压缩 " + inputFile + " 到 " + zipFileName + " ..." ); try { zipTest.zipFile(zipFileName, new File(inputFile)); System.out.println("压缩完成:)" ); } catch (Exception e) { e.printStackTrace(); } } }
若要从 ZIP 压缩管理文件内提取某个文件,要先找到待提取文件的目录进入点(该文件在 ZIP 文件内的位置),才能读取这个文件的内容。
1 2 3 4 5 6 7 8 9 10 11 12 13 14 15 16 17 18 19 20 21 22 23 24 25 26 27 28 29 30 31 32 33 34 35 36 37 38 39 40 41 42 43 44 45 46 47 48 49 50 51 52 53 54 55 56 57 58 59 60 61 62 63 import java.io.*;import java.util.zip.ZipEntry;import java.util.zip.ZipFile;import java.util.zip.ZipInputStream;public class UnzipTest void Unzip (String unZipFileName) throws Exception File unzipFile = new File(unZipFileName); String finalPath = unzipFile.getParentFile() + "/" ; ZipFile zipFile = new ZipFile(unzipFile); ZipInputStream zipInputStream = new ZipInputStream(new FileInputStream(unzipFile)); ZipEntry entry; while ((entry=zipInputStream.getNextEntry())!=null && !entry.isDirectory()) { File tmp = new File(finalPath + entry.getName()); if (!tmp.exists()) { tmp.getParentFile().mkdirs(); OutputStream writeStream = new FileOutputStream(tmp); System.out.println("解压缩 " + tmp.getAbsolutePath() + " 文件 ..." ); InputStream readStream = zipFile.getInputStream(entry); int ch = 0 ; while ((ch = readStream.read()) != -1 ) { writeStream.write(ch); } writeStream.close(); readStream.close(); } zipInputStream.closeEntry(); } zipInputStream.close(); System.out.println("解压缩已完成:)" ); } public static void main (String[] args) UnzipTest unzipTest = new UnzipTest(); String unzipFileName = "/Users/haoleeson/Downloads/Test.zip" ; try { unzipTest.Unzip(unzipFileName); } catch (Exception e) { e.printStackTrace(); } } }
2.8. 多线程 在 Java 中可通过继承 java.lang.Thread 类与实现 java.lang.Runnable 接口两种方式。
2.8.1. Theard 类与 Runnable 类实现线程区别 Thread 实现必须继承 Thread 类,而继承 Runnable 接口则更方便
2.8.2. 继承 Thread 类 1 2 3 4 5 6 7 8 9 10 11 12 13 14 15 16 17 18 19 20 21 22 23 24 25 26 27 28 29 30 31 32 33 34 35 36 37 38 39 40 41 42 43 44 45 46 47 48 49 50 51 52 53 54 55 56 57 import java.lang.Thread;public class TestThread extends Thread public TestThread (String name) super (name); } public void run () int i = 0 ; while (++i < 5 ) { System.out.println(i + ":" + this .getName()); try { Thread.sleep(1000 ); } catch (InterruptedException e) { e.printStackTrace(); } } } public static void main (String[] args) int i = 0 ; Thread test1 = new TestThread("A" ); Thread test2 = new TestThread("BBB" ); test1.start(); test2.start(); while (true ) { System.out.println((i++) + ":Main" ); try { Thread.sleep(600 ); } catch (InterruptedException e) { e.printStackTrace(); } if (i > 100 ) break ; } } }
由此可知同一进程内的子线程,它们的运行先后顺序是随机的。
2.8.3. 实现 Runnable 接口 1 2 3 4 5 6 7 8 9 10 11 12 13 14 15 16 17 18 19 20 21 22 23 24 25 26 27 28 29 30 31 32 33 34 35 36 37 38 39 40 41 42 43 44 45 46 47 48 import java.lang.Runnable;import java.lang.Thread;public class TestRunnable public static class Dosomething implements Runnable private String name; public Dosomething (String name) this .name = name; } public void run () int i = 0 ; while (++i < 5 ){ System.out.println(i+ ":" + this .name); try { Thread.sleep(1000 ); } catch (InterruptedException e) { e.printStackTrace(); } } } } public static void main (String[] args) Dosomething t1 = new Dosomething("A" ); Dosomething t2 = new Dosomething("BBB" ); Thread test1 = new Thread(t1); Thread test2 = new Thread(t2); test1.start(); test2.start(); } }
2.8.4. 操作线程的方法 2.8.4.1. 线程休眠 1 2 3 4 5 try { Thread.sleep(1000 ); } catch (InterruptedException e) { e.printStackTrace(); }
sleep () 方法通常在 run () 方法内循环使用,因 sleep () 方法的执行有可能抛出 InterruptedException 异常,所以需放在 try-catch 块中,该线程在 1 秒休眠结束后会进入就绪态 (不一定是运行态 )。
2.8.4.2. 线程的加入(join () 方法) 在当前线程 A 新建一个线程 B,线程 B 调用 join () 方法,当线程 A 放弃 CPU 使用后执行线程 B,只有线程 B 执行完毕后,才继续执行线程 A。
1 2 3 4 5 6 7 8 9 10 11 12 13 14 15 16 17 18 19 20 21 22 23 24 25 26 27 28 29 30 31 32 33 34 35 36 37 38 39 40 41 42 43 44 45 46 47 48 49 50 51 52 53 54 55 56 57 58 59 60 61 62 63 64 import java.lang.Runnable;import java.lang.Thread;public class TestJoin Thread threadA; Thread threadB; public TestJoin () super (); threadA = new Thread(new Runnable() { int countA = 0 ; @Override public void run () while (true ){ System.out.println("A: " + countA); try { Thread.sleep(100 ); threadB.join(); } catch (InterruptedException e) { e.printStackTrace(); } if (++countA > 5 ) break ; } } }); threadA.start(); threadB = new Thread(new Runnable() { int countB = 0 ; @Override public void run () while (true ) { System.out.println("B: " + countB); try { Thread.sleep(100 ); } catch (InterruptedException e) { e.printStackTrace(); } if (++countB > 5 ) break ; } } }); threadB.start(); } public static void main (String[] args) TestJoin t = new TestJoin(); } }
线程的中断
1 2 3 4 5 6 7 8 9 10 11 12 13 14 15 16 17 18 19 20 21 22 23 24 25 26 27 28 29 30 31 32 33 34 35 36 37 38 39 40 import static java.lang.Thread.sleep;public class InterruptedTest implements Runnable private boolean isStop = false ; private int count = 0 ; @Override public void run () while (true ) { if (isStop) break ; System.out.println((++count) + ". Hello..." ); try { sleep(500 ); } catch (InterruptedException e) { e.printStackTrace(); } } } public void setStop () isStop = true ; } public static void main (String[] args) InterruptedTest interruptedTest = new InterruptedTest(); Thread t = new Thread(interruptedTest); t.start(); try { sleep(1500 ); } catch (InterruptedException e) { e.printStackTrace(); } interruptedTest.setStop(); } }
2.8.5. 线程的优先级 每个线程都具有各自的优先级,系统会从多个处于就绪状态 选择优先级最高的线程进入运行状态(优先级较低的线程也有机会运行)。可用 setPriority () 方法调整线程优先级(优先级范围:1~10,设置需在线程执行 start () 前)
2.8.6. 线程同步 2.8.6.1. 线程安全 线程安全问题源于:多个线程同时存取单一对象的数据。
1 2 3 4 5 6 7 8 9 10 11 12 13 14 15 16 17 18 19 20 21 22 23 24 25 26 27 28 29 30 31 32 33 34 35 36 37 38 39 40 41 42 43 44 45 46 47 48 49 50 51 52 53 54 55 56 57 58 59 60 61 62 public class TestThreadUnsafe implements Runnable int leftNum = 5 ; int purchaseTime = 0 ; @Override public void run () int readValue; while (true ){ if ((readValue = leftNum) > 0 ) { try { Thread.sleep(100 ); } catch (InterruptedException e) { e.printStackTrace(); } System.out.println("ReadLeftNum = " + readValue + ", After Purchase leftNum = " + --leftNum); purchaseTime++; } else { break ; } } } public static void main (String[] args) TestThreadUnsafe testThreadUnsafe = new TestThreadUnsafe(); Thread threadA = new Thread(testThreadUnsafe); Thread threadB = new Thread(testThreadUnsafe); Thread threadC = new Thread(testThreadUnsafe); Thread threadD = new Thread(testThreadUnsafe); System.out.println("不安全的多线程演示:\n总票数:" + testThreadUnsafe.leftNum); threadA.start(); threadB.start(); threadC.start(); threadD.start(); try { Thread.sleep(3000 ); } catch (InterruptedException e) { e.printStackTrace(); } System.out.println("总共买票次数:" + testThreadUnsafe.purchaseTime); } }
从运行结果可看出最后打印的剩余票数值为负值,这时因为有两个线程读取值的时候 leftNum 值时为 1(满足 leftNum>0)的时刻,已有其他线程进入” 购票操作” 只不过还未修改值,这就导致当最终这两个线程此时读到还有票,但等到其他线程完成修改值后(票数已为负),仍然执行 - 1 操作导致票数为负。
2.8.6.2. 线程同步机制 2.8.6.2.1. synchronized (“”){} 同步块 1 2 3 4 //同步锁 synchronized (Object){ //Do something... }
考虑线程同步机制的多线程买票程序实现如下:
1 2 3 4 5 6 7 8 9 10 11 12 13 14 15 16 17 18 19 20 21 22 23 24 25 26 27 28 29 30 31 32 33 34 35 36 37 38 39 40 41 42 43 44 45 46 47 48 49 50 51 52 53 54 55 56 57 58 59 60 61 62 public class TestThreadSafe implements Runnable int leftNum = 5 ; int purchaseTime = 0 ; @Override public void run () int readValue; while (true ){ synchronized ("" ){ if ((readValue = leftNum) > 0 ){ try { Thread.sleep(100 ); } catch (InterruptedException e) { e.printStackTrace(); } System.out.println("ReadLeftNum = " + readValue + ", After Purchase leftNum = " + --leftNum); purchaseTime++; } else { break ; } } } } public static void main (String[] args) TestThreadSafe testThreadSafe = new TestThreadSafe(); Thread threadA = new Thread(testThreadSafe); Thread threadB = new Thread(testThreadSafe); Thread threadC = new Thread(testThreadSafe); Thread threadD = new Thread(testThreadSafe); System.out.println("安全的有线程同步机制的多线程演示:\n总票数:" + testThreadSafe.leftNum); threadA.start(); threadB.start(); threadC.start(); threadD.start(); try { Thread.sleep(3000 ); } catch (InterruptedException e) { e.printStackTrace(); } System.out.println("总共买票次数:" + testThreadSafe.purchaseTime); } }
相比于上一个未考虑线程同步的例子来说,这个考虑线程同步只是将线程对关键的单一对象数据的存取操作放在了 synchronized (“”){} 同步块内,Java 的同步机制会保证单位时刻最多只有一个线程在执行同步块内的操作,所以能达到线程同步效果避免不安全。
1 2 3 synchronized ElementType function () }
考虑线程同步机制的多线程买票程序实现如下:
1 2 3 4 5 6 7 8 9 10 11 12 13 14 15 16 17 18 19 20 21 22 23 24 25 26 27 28 29 30 31 32 33 34 35 36 37 38 39 40 41 42 43 44 45 46 47 48 49 50 51 52 53 54 55 56 57 58 59 60 61 62 public class TestThreadSafe2 implements Runnable int leftNum = 5 ; int purchaseTime = 0 ; synchronized boolean purchaseAticket () int readValue; if ((readValue = leftNum) > 0 ){ try { Thread.sleep(100 ); } catch (InterruptedException e) { e.printStackTrace(); } System.out.println("ReadLeftNum = " + readValue + ", After Purchase leftNum = " + --leftNum); purchaseTime++; return true ; } return false ; } @Override public void run () while (purchaseAticket()); } public static void main (String[] args) TestThreadSafe2 testThreadSafe = new TestThreadSafe2(); Thread threadA = new Thread(testThreadSafe); Thread threadB = new Thread(testThreadSafe); Thread threadC = new Thread(testThreadSafe); Thread threadD = new Thread(testThreadSafe); System.out.println("安全的有线程同步机制的多线程演示:\n总票数:" + testThreadSafe.leftNum); threadA.start(); threadB.start(); threadC.start(); threadD.start(); try { Thread.sleep(3000 ); } catch (InterruptedException e) { e.printStackTrace(); } System.out.println("总共买票次数:" + testThreadSafe.purchaseTime); } }
与第二种用 synchronized (“”){} 同步块用修饰不同之处在于,这种是通过 synchronized 关键字修饰的同步方法,单位时间内,最多只有一个线程执行该方法 purchaseAticket (),所以能达到线程同步效果避免不安全。
2.9. 网络通信 2.9.1. 网络协议 2.9.1.1. IP 协议 IP 是 Internet Protocol 的简称,它是一种网络协议。Internet 采用的协议是 TCP/IP 协议。
2.9.1.2. TCP 传输控制协议 (Transmission Control Protocol) TCP 协议是一种 以固接线为基础的协议,它提供两台计算机间可靠的数据传送。
特征:
保证数据能够确实送达
抵达的数据排列顺序与送出时的顺序相同
因此,TCP 协议适合可靠性要求较高的场合(HTTP、FTP 和 Telnet 等都需要使用可靠的通信频道)
2.9.1.3. UDP 用户数据协议 (User Datagram Protocol) UDP 是无线连接通信协议,不保证可靠数据的传输。
特征:
能够向若干个目标发送数据
能够接收发自若干个源的数据
接收多个数据包时不保证接收数据包的顺序与源发送顺序相同
因此 ,UDP 协议适合一些对数据准确性要求不高,对传输速度和时效要求非常高但允许小部分数据包丢失或传送顺序有所不同也不会严重损害需求的场合 (如:网络聊天室、在线影片等)