ID3算法——数据挖掘

1. ID3算法简介

  • ID3算法最早是由罗斯昆(J.Ross Quinlan)于1975年在悉尼大学提出的一种分类预测算法,算法的核心是“信息熵(Information entropy)”。
  • ID3算法通过计算每个属性的信息增益,认为信息增益高的是好属性,每次划分选取信息增益最高的属性为划分标准,重复这个过程,直至生成一个能完美分类训练样例的决策树。

2. Python编程实现ID3决策树建立算法

ID3决策树建立算法步骤

  • S1.决定分类属性;
  • S2.对目前的数据表,建立一个节点N
  • S3.如果数据库中的数据都属于同一个类,N就是树叶,在树叶上标出所属的类
  • S4.如果数据表中没有其他属性可以考虑,则N也是树叶,按照少数服从多数的原则在树叶上标出所属类别
  • S5.否则,根据平均信息期望值E或GAIN值选出一个最佳属性作为节点N的测试属性
  • S6.节点属性选定后,对于该属性中的每个值:从N生成一个分支,并将数据表中与该分支有关的数据收集形成分支节点的数据表,在表中删除节点属性那一栏如果分支数据表非空,则运用以上算法从该节点建立子树。

2.1. 计算样本的信息期望

1
2
3
4
5
6
7
8
9
10
11
12
13
14
15
16
17
# 计算样本的信息期望
def calcH(dataSet):
numOfRow = len(dataSet) #得到行数,数据量个数
#为所有的分类类目创建字典
# labelCounts: 表示最后一列的字典统计信息(属性值种类及个数)
labelCounts = {}
for iRow in dataSet:
currentLable = iRow[-1] #取得当前行最后一列数据(决策属性值)
if currentLable not in labelCounts.keys(): #如果不在字典中,则添加到字典中
labelCounts[currentLable] = 0
labelCounts[currentLable] += 1 #如果在字典中,则对应的key计数+1
#计算给定样本所需的数学期望信息(香农熵)
H = 0.0 #测试样本的信息期望
for key in labelCounts:
prob = float(labelCounts[key]) / numOfRow #即p(t)
H -= prob * math.log(prob, 2)
return H #返回样本的信息期望

2.2. 根据第 i 列属性值A划分子集

1
2
3
4
5
6
7
8
9
10
#得到根据第 i 列属性值A划分成的子集
#输入三个变量(待划分的数据集,特征,分类值)
def splitDataSet(dataSet, axis, value):
retDataSet = [] #表示由当第 i 列属性值A划分成的子集
for featVec in dataSet:
if featVec[axis] == value:
reduceFeatVec = featVec[:axis]
reduceFeatVec.extend(featVec[axis+1:])
retDataSet.append(reduceFeatVec)
return retDataSet #表示由当第 i 列属性值A划分成的子集(不含划分特征A)

2.3. 得到最大信息增益条件属性列下标

1
2
3
4
5
6
7
8
9
10
11
12
13
14
15
16
17
18
19
20
21
22
23
24
def chooseBestFeatureToSplit(dataSet):
numOfFeature = len(dataSet[0])-1 #条件属性值个数
H = calcH(dataSet)#返回样本的信息期望
bestInforGain = 0 #最大信息增益值,初始化为0
bestFeature = -1 ##最大信息增益值对应的条件属性列,,初始化为 -1
#分别计算每一个条件属性的熵
for i in range(numOfFeature):
# featList 表示第 i 列的所有值
featList = [number[i] for number in dataSet] #得到某个特征下所有值(某列)
# uniqualVals 表示当前第 i 列的条件属性内的属性值的列表
uniqualVals = set(featList) #set无重复的属性特征值
# E_A:表示由属性 A 划分子集的熵或平均期望
E_A = 0.0
for value in uniqualVals:
# subDataSet: 表示由当第 i 列属性值A划分成的子集
subDataSet = splitDataSet(dataSet, i, value)
prob = float(len(subDataSet)) / float(len(dataSet)) #即p(t)
E_A += prob * calcH(subDataSet)#对各子集香农熵求和
Gain_A = H - E_A #计算条件属性 第 i 列 的信息增益
# 从所有条件属性对应的信息增益中挑选最大信息增益(的列下标)
if (Gain_A > bestInforGain):
bestInforGain = Gain_A
bestFeature = i
return bestFeature #返回特征值(最佳分类列下标)

2.4. 建立ID3决策树核心函数

1
2
3
4
5
6
7
8
9
10
11
12
13
14
15
16
17
18
19
20
21
# 决策树构造函数
def createTree(dataSet, labels):
classList = [example[-1] for example in dataSet]
#如果类别相同,停止划分
if classList.count(classList[-1]) == len(classList):
return classList[-1]
#长度为1,返回出现次数最多的类别
if len(classList[0]) == 1:
return majorityCnt(classList)
#按照信息增益最高选取分类特征属性
bestFeat = chooseBestFeatureToSplit(dataSet)#返回分类的特征序号
bestFeatLable = labels[bestFeat] #该特征的label
myTree = {bestFeatLable:{}} #构建树的字典
del(labels[bestFeat]) #从labels的list中删除该label
featValues = [example[bestFeat] for example in dataSet]
uniqueVals = set(featValues)
for value in uniqueVals:
subLables = labels[:] #子集合
#构建数据的子集合,并进行递归
myTree[bestFeatLable][value] = createTree(splitDataSet(dataSet,bestFeat,value),subLables)
return myTree # 最后生成的决策树myTree是一个多层嵌套的字典

2.5. 使用Matplotlib绘制决策树

1
2
3
4
5
6
7
8
9
10
11
12
13
14
15
16
17
18
19
20
21
22
23
24
25
26
27
28
29
30
31
32
33
34
35
36
37
38
39
40
41
42
43
44
45
46
47
48
49
50
51
52
53
54
55
56
57
58
59
60
61
62
63
64
65
66
67
68
69
70
71
72
73
74
75
76
77
78
79
# ==================使用Matplotlib绘制决策树============================
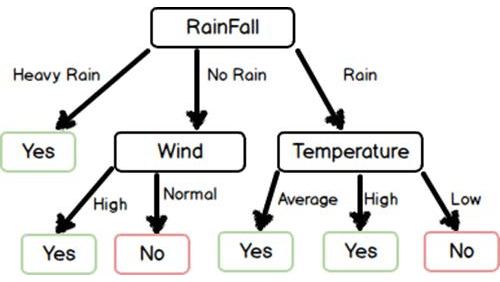
decisionNode = dict(boxstyle="square", ec='k', fc='yellow',)#决策点样式
leafNode = dict(boxstyle="round", ec=(1., 0.5, 0.5), fc=(1., 0.8, 0.8),)#叶节点样式
arrow_args = dict(arrowstyle='<-') #箭头样式

# 绘制节点
def plotNode(nodeTxt, centerPt, parentPt, nodeType):
createPlot.ax1.annotate(nodeTxt, xy=parentPt, xycoords='axes fraction',
xytext=centerPt, textcoords='axes fraction',
va='center', ha='center', bbox=nodeType, arrowprops=arrow_args)

def createPlot():
fig=plt.figure(1,facecolor = 'white')
fig.clf()
createPlot.ax1=plt.subplot(111, frameon=False)
plotNode('决策节点', (0.5,0.1), (0.1,0.5), decisionNode)
plotNode('叶节点', (0.8,0.1), (0.3,0.8), leafNode)
plt.show()

#获取叶节点数量(广度)
def getNumLeafs(myTree):
numLeafs=0
firstStr=list(myTree.keys())[0]#'dict_keys' object does not support indexing
secondDict=myTree[firstStr]
for key in secondDict.keys():
if type(secondDict[key]).__name__=='dict':
numLeafs+=getNumLeafs(secondDict[key])
else:numLeafs+=1
return numLeafs

#获取树的深度的函数(深度)
def getTreeDepth(myTree):
maxDepth=0
firstStr=list(myTree.keys())[0]
secondDict=myTree[firstStr]
for key in secondDict.keys():
if type(secondDict[key]).__name__=='dict':
thisDepth=1+getTreeDepth(secondDict[key])
else: thisDepth=1
if thisDepth > maxDepth:
maxDepth=thisDepth
return maxDepth

#定义在父子节点之间填充文本信息的函数
def plotMidText(cntrPt,parentPt,txtString):
xMid=(parentPt[0]-cntrPt[0])/2+cntrPt[0]
yMid=(parentPt[1]-cntrPt[1])/2+cntrPt[1]
createPlot.ax1.text(xMid,yMid,txtString)

#定义树绘制的函数
def plotTree(myTree, parentPt, nodeTxt):
numLeafs=getNumLeafs(myTree)
depth=getTreeDepth(myTree)
firstStr=list(myTree.keys())[0]
cntrPt=(plotTree.xOff+(1.0+float(numLeafs))/2/plotTree.totalW,plotTree.yOff)
plotMidText(cntrPt, parentPt, nodeTxt)
plotNode(firstStr, cntrPt, parentPt, decisionNode)
secondDict=myTree[firstStr]
plotTree.yOff=plotTree.yOff -1/plotTree.totalD
for key in secondDict.keys():
if type(secondDict[key]).__name__=='dict':
plotTree(secondDict[key], cntrPt, str(key))
else:
plotTree.xOff=plotTree.xOff+1.0/plotTree.totalW
plotNode(secondDict[key],(plotTree.xOff,plotTree.yOff),cntrPt,leafNode)
plotMidText((plotTree.xOff,plotTree.yOff),cntrPt,str(key))
plotTree.yOff=plotTree.yOff+1/plotTree.totalD

#显示决策树
def createPlot(inTree):
fig = plt.figure(1, facecolor='white')
fig.clf()
axprops = dict(xticks=[], yticks=[])
createPlot.ax1 = plt.subplot(111, frameon=False, **axprops)
plotTree.totalW = float(getNumLeafs(inTree))
plotTree.totalD = float(getTreeDepth(inTree))
plotTree.xOff = -0.5/plotTree.totalW; plotTree.yOff = 1.0;
plotTree(inTree, (0.5, 1.0), '')
plt.show()

2.6. 处理得到运动和不运动与天气之间的规则树

数据存放于ID3dataEn.csv文件

文件:ID3dataEn.csv
1
2
3
4
5
6
7
8
9
10
11
12
13
14
sunny,85,85,unwindy,unsuitable
sunny,80,90,windy,unsuitable
cloudy,83,78,unwindy,suitable
rain,70,96,unwindy,suitable
rain,68,80,unwindy,suitable
rain,65,70,windy,unsuitable
cloudy,64,65,windy,suitable
sunny,72,95,unwindy,unsuitable
sunny,69,70,unwindy,suitable
rain,75,80,unwindy,suitable
sunny,75,70,windy,suitable
cloudy,72,90,windy,suitable
cloudy,81,75,unwindy,suitable
rain,71,80,windy,unsuitable

2.7. 加载数据

1
2
3
4
5
6
7
8
9
# 加载数据文件函数
def loadDataFile(filename):
print('加载', filename, '文件数据...')
fr = open(filename)
data = [inst.strip().split(',') for inst in fr.readlines()]
return data

dataLabels = ['weather', 'temperature', 'humidity', 'wind conditions', 'exercise'] #数据的属性名称
data = loadDataFile('ID3dataEn.csv') #加载数据文件

2.8. 预处理 温度和湿度 数据

由于温度和湿度数据量过多,故将温度和湿度数据进行整合,将数据取十位整数

1
2
3
4
5
6
7
8
9
10
11
#预处理 温度和湿度 数据
def dataWrangling(data, iColumn):
for iRow in range(len(data)):
num = int(data[iRow][iColumn])
num = num - (num%10)
data[iRow][iColumn] = str(num)
return data

#预处理 温度和湿度 数据
data = dataWrangling(data, 1) #整理 温度数据 取“十位”整数
data = dataWrangling(data, 2) #整理 湿度数据 取“十位”整数

2.9. 主函数

1
2
3
4
5
6
7
8
9
10
11
12
# main函数
if __name__ == '__main__':
dataLabels = ['weather', 'temperature', 'humidity', 'wind conditions', 'exercise'] #数据的属性名称
data = loadDataFile('ID3dataEn.csv') #加载数据文件
print('预处理前数据:', data)
#预处理 温度和湿度 数据
data = dataWrangling(data, 1) #整理 温度数据 取十位数
data = dataWrangling(data, 2) #整理 湿度数据 取十位数
print('处理后数据:', data)
myTree = createTree(data, dataLabels) #构造决策树
print('决策树构造函数测试', myTree)
createPlot(myTree) #显示决策树

2.10. 得到的决策树图如下所示

myTree决策树图

备注
运行平台:Arch Linux
运行环境:Intellij IDEA
待分类数据集文件ID3dataEn.csv
源代码ID3.py